The legendary Hornburg Battle from The Two Towers. Helm's Deep by KingDoom is a WarCraft III map where Isengard uruk-hais try to overcome Rohan defenders before Gandalf and Eomer's Rohirrims arrive.
The legendary Hornburg Battle from The Two Towers. Helm's Deep by KingDoom is a WarCraft III map where Isengard uruk-hais try to overcome Rohan defenders before Gandalf and Eomer's Rohirrims arrive.
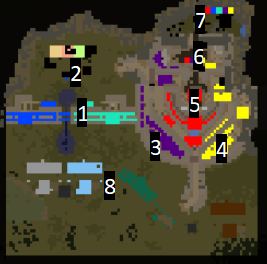
Rohan units | Isengard units | General strategies
Théoden | Haldir | Aragorn | Legolas | Gimli | Mauhúr | Uglúk | Mirhúk | Battle Troll
This is the battle of Helm's Deep from the Lord of the Rings. Saruman has unleashed Isengard's forces: the mighty Uruk-Hais, 10 000 in number, are marching to end the realm of men (or at least Rohan). Théoden King and his people have sought refuge to Helm's Deep, the great fortress of Rohan where the fate of the free people will be decided.
One map. nine players (heard that anywhere else?): five Rohan heroes and four Isengard heroes. This map is intended to be as close as possible to the original scenario material, but elements might be altered for a better gameplay.
Starts with a few hundred units distributed amongst the five Rohan players: Théoden the King, Haldir the Galadhrìm, Aragorn the Dunedaìn, Legolas Prince of the Woodland Realm and Gimli son of Gloïn, dwarf of Erebor. Théoden, Legolas and Gimli are defending the keep with the Rohan soldiers, while Aragorn and Haldir are defending the wall with an army of elves. Details in the next chapter.
The objective is to hold 24 minutes of game time, until Gandalf the White arrives with the Rohirrims guided by Eomer to save the people of Rohan. When Gandalf arrives, Isengard players can't produce any more units and are left with what they have on the map. Kill every last one of them to win!
players start with 4 War leaders each, able to recruit Uruk-hais of diverse specialization onto the field. The heroes are Mauhúr (Gray), Uglúk (Light Blue), Mirhúk (Dark Green) and the Battle Troll (Brown).
The goal is to break Rohan defence to reach the women and children hidden in the caves and when those die, the game is won for Isengard!
Militia: Melee units that can become handy if you lack soldiers. Should be used as spearman the earliest possible.
Rohan Soldier: Good melee unit. Benefits greatly from melee armor upgrades.
King's Guard: Very tanky melee unit, has Rohan Strength (regeneration aura).
Rohirrim: Best Rohan unit, very tanky, good damages. Can only be summoned by Théoden ultimate skill and when the Hall Gate is destroyed.
Elf Warrior: Good melee unit. Needs Shield upgrade to gain armor and damage reduction. Can switch into archer.
Rohan Banners: Those have armor and damage auras for your troops. When destroyed, you can repair them with a King’s Guard for 100 gold.
| Unit | Militia | Rohan Soldier | King's Guard | Rohirrim | Elf Warrior |
|---|---|---|---|---|---|
| Move Speed | 250 | 250 | 250 | 400 | 280 |
| Hit points | 550 | 700 | 1000 | 2000 | 700 |
| Attack cooldown | 1.00 | 1.20 | 1.00 | 1.75 | 1.20 |
| Damage + upgrade | 17-20 + 3-6 | 24-30 + 2-8 | 48-56 + 4-12 | 50-60 + 5-15 | 22-25 + 3-6 |
| Armor + upgrade | 4 + 2 | 4 + 3 | 5 + 3 | 6 + 3 | 1 + 1 |
| Bounty | 2 | 3 | 10 | 0 | 3 |
| Special Upgrades | Defence State | Defence State | Defence State | Equip Shields |
Spearman: Switched from militia. Useful as a secondary source of ranged damage.
Rohan Archer: Main source of damage, very low HP. Archers are killed very quickly if melee units manage to get to them.
Elf Archer: Best ranged unit. Can switch into warrior.
| Unit | Spearman | Rohan Archer | Elf Archer |
|---|---|---|---|
| Move Speed | 250 | 250 | 260 |
| Hit points | 275 | 300 | 275 |
| Attack cooldown | 1.85 | 1.75 | 1.50 |
| Attack range | 850 | 1000 | 1000 |
| Damage + upgrade | 27-31 + 1-5 | 32-37 + 1-6 | 31-36 + 1-6 |
| Armor + upgrade | 0 + 2 | 0 + 2 | 1 + 1 |
| Bounty | 2 | 2.5 | 3 |
| Special Upgrades | Defence State Extended Range | Extended Range | Extended Range |
| Defence State | Reduce damage taken by bolts to 50%. Reduce movement speed to 30%. |
|---|---|
| Extended Range | Adds 200 range to the unit. |
| Equip Shields | +2 armor 50% chance to deflect 3 damage per hit. |
| Iron Forged Shields | Adds +3 to Equip Shields deflect damage. |
Swordsman: Free. Auto trained from War Leaders. Should continuously be trained unless you want to make non-free units.
Berserker: Good DPS, can benefit from Cleaving Attack to damage areas.
Shieldman: Can sustain a lot of arrows damages with Defence State. Taunts archers.
Crossbowman: Expensive, ranged unit, can help getting higher overall DPS, good at targeting archers.
Warg Rider: Good overall and fast unit, but cannot climb on ladders. Large collision size.
| Unit | Swordsman | Berserker | Shieldman | Crossbowman | Warg Rider |
|---|---|---|---|---|---|
| Move Speed | 270 | 270 | 270 | 270 | 350 |
| Hit points | 290 | 660 | 525 | 350 | 1100 |
| Attack cooldown | 1.92 | 1.55 | 2.50 | 1.80 | 1.62 |
| Damage + upgrade | 18-21 + 2-5 | 33-39 + 1-7 | 26-30 + 1-5 | 20-23 + 0-0 | 53-57 + 4-8 |
| Armor + upgrade | 2 + 1 | 4 + 1 | 5 + 3 | 0 + 2 | 7 + 3 |
| Bounty | 1.75 | 2 | 5 | 5 | 5 |
| Special Upgrades | Invigorated Pace Strengthened Breed | Invigorated Pace Cleaving Attack | Invigorated Pace Strengthened Breed Defence State | Invigorated Pace Ignited Bolts Heavy Shot | Invigorated Pace Strengthened Breed |
Siege Ladder: Can siege and unsiege to any outer wall. Cannot be sieged inside the keep.
Battering Ram: Very high damage, can only target gates. Needed to kill gates. Has specific upgrades researchable on the ram itself.
Lighter: Can light near bombs. Fragile unit.
Bomber: Deploys a bomb.
| Unit | Siege Ladder | Battering Ram | Lighter | Bomber |
|---|---|---|---|---|
| Move Speed | 220 | 220 | 270 | 270 |
| Hit points | 2500 | 3000 | 250 | 290 |
| Armor + upgrade | 20 | 20 | 1 + 1 | 2 + 0 |
| Bounty | 80 + 20 | 80 + 40 | 5 | 5 |
| Upgrades / abilities | Reinforced Structure | Improve Repair Charge | Ignite bombs within 250 range. Bomb explosion radius 480 Bomb damage at core 500 Bomb damage decreases over distance. | Deploy bomb. |
| Invigorated Pace | +15% Movement speed for 10 seconds when trained. |
|---|---|
| Strengthened Breed | +10% Attack speed. +8% Hit Points. |
| Cleaving Attack | Deals 8% damage in a 150 AoE around primary target. |
| Defence State | Reduce damage taken by arrows to 10%. Reduce movement speed to 0. |
| Ignited Bolts | Increases damage by 10. |
| Heavy Shot | Knocks back. -50% Move speed for 2 seconds. |
| Reinforced Structure | Level 1 reduces damage taken by 15. Level 2 reduces damage by an additional 10 for a total of 25. |
| Improve (Battering Ram) | +750 Maximum hit points. +375 Damage. |
| Repair (Battering Ram) | Repair up to 3000 lost hit points. |
Focus ladders. A ladder costs lumber which is a limited resource for Isengard players. It gives a good bounty (80+20) and will force uruks to train more ladders and slow their progress. Always have a part of your archers shooting at ladders.
Upgrade! You should upgrade as soon as you have enough gold to do so. Have a control group to quickly select your forge at any time and launch upgrades. The upgrades order depends on your character.
How and when to retreat. Bad retreats are why new Rohan players lose most of the time. You should never overstay on your positions. As soon as you feel overwhelmed, retreat to the nearest chokepoint. Always send archers first as your melee units are tanking the damage, and then retreat your melee units last. If your hero has an AoE stun or defensive skill, this is when It can come in handy.
Items. Mending is very cheap and can be used throughout the game as you micro back your wounded units. In the late game, when your upgrades are all researched, or if you've lost all your units and you feel like upgrades are not worth it anymore, you should use Metal Scraps and Heroic Tales to keep the remaining units alive for as long as possible. You should get a retreat tactics sometime soon enough to avoid getting trapped, especially if you're not a veteran player.
Ladders. The absolute minimum number of ladders to use is 2. You need a few ladders to constantly change your attacking point. Try to snipe archers and make the Rohan players shift their units to keep them busy and try to force positioning mistakes.
Heroes. Don't send your hero with all your units atop a wall and get him killed. You need your hero to level up in the early to mid-game. The aura makes a big difference, stay in range of the battle, down the wall. Be careful to not get sniped, especially against Legolas.
Upgrades. The first investment should be upgrades. Attack and/or Strengthened breed offer a huge return on investment in the long run because you are going to train around 2000 swordsmen. The sooner you get upgrades, the most units overall will benefit from them.
Rams. Don't attack gates in the early game. You need a ram. It has an Improve and a Repair ability. Each Isengard player should make a ram when they get the lumber for it, and improve it as much as they can. Repair when heavily damaged. Cover your rams with units attacking the gate, and eventually shieldmen to taunt archers.
What units to make? In the beginning you have a limited amount of gold as the walls are well defended. After you get a few levels of upgrades, either get Cleaving Attack or Ignited Bolts. Then you can start making Berserkers or Crossbowmen to help out your Swordsmen. Strengthened Breed doesn’t affect Berserkers so if you plan to make them, you can have a very strong timing by going +3 melee attack, then cleaving. Berserkers can pay for themselves if not handled properly by Rohan players. Don’t over commit your gold on units if you still have upgrades to research.
Items. Potions are kind of cheap and are good to get mana and cast more skills. War Drums are very efficient to catch retreating units or try to force your way into the caves in the late game. You can also use Man Flesh to heal a bunch of damaged expensive units, or heal a big pack of swordsmen that suffered from an AoE spell. Items should not be a priority unless you know what you are doing.
The King has the bulk of his forces inside the Keep, on the inner wall. His units mainly consist of Rohan soldiers. He also has a handful of archers and a pack of militias that can be later turned into spearmen.
As the player with the most soldiers, Théoden is very tanky and is a support player. His job is to reinforce wherever Isengard is attacking en masse to hold key positions of defence.
You should focus on melee upgrades and get spears early enough to benefit from it in the long run, which will work as your source of income. Extended range (+200) can help to maximize spearmen efficiency (850 range only, regular archers have 1000) but it is an expensive upgrade to get on top of spears, especially for Théoden who has a low income.
Hero skills:You are holding the wall with Aragorn. Your units are elves which can switch to bow or swords as needed. Needless to say the micro potential of elves is huge. You can switch the injured ones into archers and bring forth the fully healed ones as warriors.
About upgrades, you need all of them! Try to get shields early enough to tank Berserkers that can be a threat in the early to mid game though. Remember your goal is to hold for as long as possible.
A key element for the wall defenders is the Elf Trainers. Elves spawn periodically as long as your trainer is alive, and this is why you have to defend the wall for as long as possible. However, if you get overwhelmed and start losing efficiency as you trade elves for uruk-hais, maybe it is time to back off. It's important to have at least 30 elves retreating into the keep where you can balance off the soldiers/archers count of the other players by switching elves.
The last main point to take into account is the breach. Bombs are available 7:30 minutes into the game (at 16:30 on Gandalf timer). If you held the wall up to this point, it is already a good start. Don't overstay your welcome once the wide front of the breach is open. A good uruk will cut off the retreat path to the keep by coming from the right part of the wall. Once the breach is open, uruks can overwhelm the wall and cut off the access to ramps. Be careful to not get trapped up there!
On a last note, I will add that elves should be switched to warriors when retreating: they will not die as easily as archers and they have a smaller collision radius which makes it easier to manoeuver around. If you retreated too late, you might want to get Retreat Tactics and increase your movement speed.
Hero skills:For the elves and wall strategy, see Haldir above. Don't retreat alone as you will cut off Haldir from the keep and leave him to die as he gets surrounded.
Hero skills:It is important to hold your side as long as the wall is defended by Haldir and Aragorn because they will get completely cut off from the rest of the keep if you fail. If you cannot hold anymore, retreat to the chokes and warn Haldir and Aragorn so they can fall back if needed.
Your wall is hard to hold because it is in the middle of the map and will probably be attacked by 2 or 3 uruk players at some point. Théoden will have to help you, but you also need to bring all your archers to snipe down the ladders. The upmost ladder on your wall can cut you off from the choke to exit your wall, given Mauhúr or Uglúk can use it to surprise you. Don't let this happen: have soldiers ready to surround enemies up the ladders and snipe ladders. Focus ladders. It's important.
If Mirhúk attacks the small wall, send archers to help out. Don't send all your soldiers as Uruks may switch to your wall and overwhelm the keep.
Use Legolas to snipe crossbowmen which are very expensive and have a lower range. Also attack heroes in range to push them back and get their aura out of the front battle.
Hero skills:You hold a key position against Battle Troll. You should be able to hold until everyone else has backed off to the keep inner wall. Théoden can help you if Mirhúk and Battle Troll choose to push hard on you. If your side gets overwhelmed, uruks gain a direct access to the hall and into the caves.
There is a limited number of ladders that can siege on your wall because of the mountains.
You can bring archers down behind your wall to have them in a safe position. It will be a little tricky to micro but they should stay in place on hold position. Be very careful should the main gate be rammed down and you have archers trapped down there.
You have a good number of soldiers to tank, so try not to waste your militias and get them the spears upgrade to increase your damage output.
Hero skills:As the leftmost Isengard player, your job is to dig the wall defenses to make an opening into the inner court. Siege ladders on different locations to try and kill archers. Coordinate attacks with Uglúk to maximize efficiency.
Make a bomber as soon as you can to open the wall and flood the inner court with your uruks. Once you claim the inner court, you can kill the elf trainers to end the elf spawn.
Sharku and Uglúk should get a ram to punch the keep gate through the breach, then you can attack the keep from there. If Rohan focuses the ram, use a few shieldmen with defend upgrade to draw fire.
Killing the Keep Gate enables the Relocate upgrade that will move your War Leaders into the courtyard, near the Keep Gate entrance. You can then siege ladders on the keep wall inside the courtyard and attack from there.
Hero skills:You are attacking the wall with Mauhúr. Siege ladders on different locations to try and kill archers. Coordinate attacks with Mauhúr to maximize efficiency.
Once the wall is overrun, Mauhúr and Uglúk should make rams to destroy the keep gate. You can help Mirhúk from there on to break through the left keep wall.
Hero skills:You start out attacking the Legolas wall. If Théoden reinforces too heavily, you may help out Battle Troll or attack the wall where defense will be weaker.
Once the deep wall is overrun, Uglúk should be helping you get through Legolas’ defense. At that time, help Battle Troll digging on Gimli and make a ram to break the main gate.
Hero skills:Your job is to pierce through Gimli’s defense and open the right flank on the keep. If Théoden reinforces too much on your side, you can help Mirhúk on the left keep wall.
Both Théoden and Gimli have many soldiers. Berserkers with cleaving attack can really dig through large chunk of soldiers.
Once you have enough lumber, make a ram to break down the main gate to open a new flank.
If you get through the right flank to the inner keep wall, you can cut the retreat of Rohan and make a carnage with other uruk players coming in.
Hero skills: